

How To Clean A Kimber 380
Cleaning Instructions for a 1911 .45 ACP Pistol
1911 Cleaning Instructions
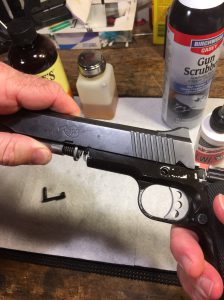
In this article, I am going to show you, step by step, how to properly field strip and clean a Kimber 1911 Pro Carry II pistol. You will see the gun cleaning tools and supplies that I have used with great results over the past 10 years of heavy gun use.
Here is some information on setting up a Homemade Gun Cleaning Station.
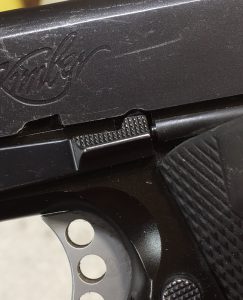
This Kimber .45 ACP model has a 4.25 "bull barrel" which has a different disassembly procedure than a 5" Government Model 1911. The main difference is the tool that is used to remove the slide.
Tools To Disassemble Your Kimber 1911
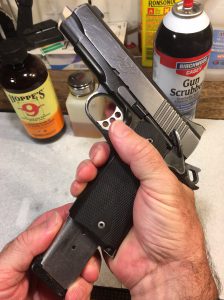
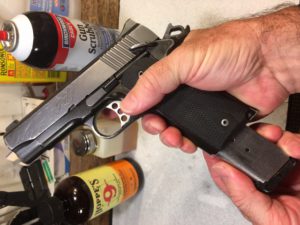
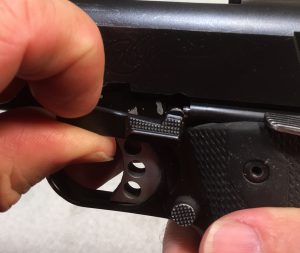
The Commander (Pro) models with 4.25″ bull barrel (bushingless) use a "take down" tool. This is the tool will use to field strip the Kimber Pro Carry II in this article.
If you have a 5" barrel 1911, see my videos: Field Stripping a Kimber 1911 Aegis Elite and Reassembly of a Kimber 1911 Aegis Elite. These videos will work for any 1911 that uses a barrel bushing, which is most 5″ Government models. You can view my step-by-step instructions in the article: Field Stripping and Reassembling a Kimber 1911
The process is pretty easy and quick once you have done it a couple times.
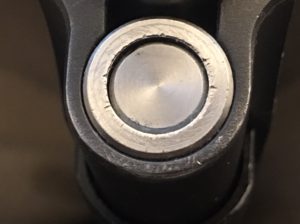
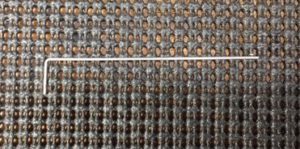
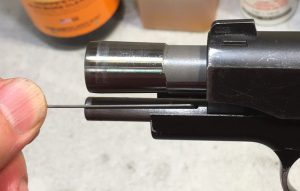
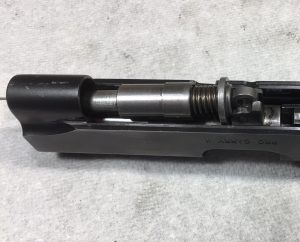
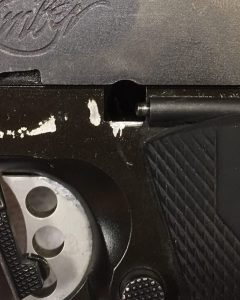
Update: I have noticed that repeated use of the Kimber Take-down tool causes some marking on the end of the guide rod. Here is a picture of my Pro Carry.
My gun has seen better days, but if it was new, this would bother me. If you want to avoid this, there is a tool that slips over the end of the guide rod and does not damage anything. It will be used at Step 3 below. It makes the 1911 field strip process much easier as well. I will be modifying the pictures soon to include this tool in the instructions. In the meantime, you can check it out here:
Kimber Ultra Tool
I recommend cleaning this gun after every 200-300 rounds, or after every time you shoot it.
Also, do not forget to replace your recoils spring regularly for best performance. See How and When to Replace the Recoil Spring on your Kimber 1911.
I can tell you I have put thousands of rounds through this 1911 and have had a few issues and replaced a few springs. I will explain all these things in another post. Also see my post on a quick 1911 cleaning you can use if you can't take the gun apart.
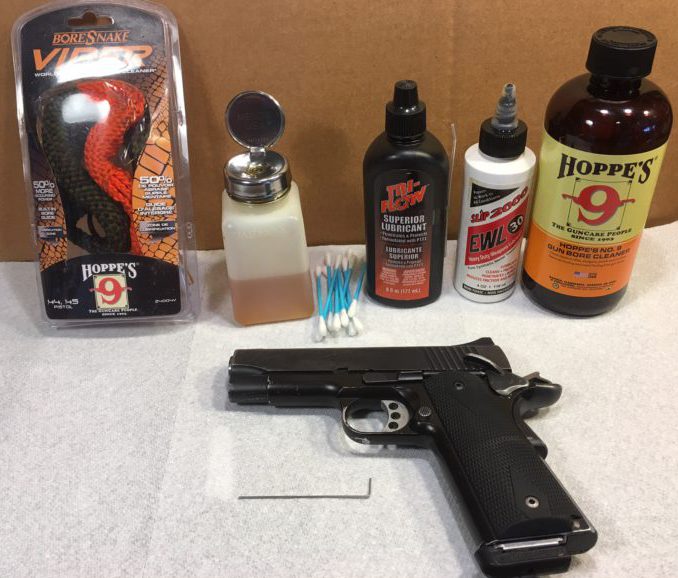
Gun Cleaning Supplies
Here is what I use to clean my 1911:
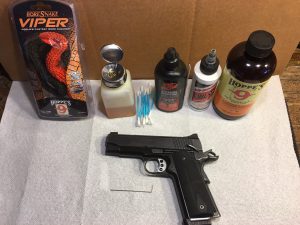
- Boresnake or a rod and patches for a .45 caliber barrel
- Menda Pump Chemical Dispenser
- Kimber take-down tool (small L-shaped pin that came with your gun, or a small paper clip)
- Optionally, 1911 Ultra Tool for Kimber Pro and Compact, will not damage your guide rod.
- Hoppes Number 9 gun cleaning solvent
- Slip 2000 EWL 30 or try the best, Veteran Owned Original Gun Oil. (Use Discount Code SAVEWITHDAVE)
- Some gun cleaning swabs, cotton swabs and paper towels. Foam swabs work even better as they do not leave any strands behind.
- Optional: Birchwood Casey Synthetic Safe Gun Scrubber
Save Time by Using a Boresnake Instead of Rod and Patches
My favorite time-saving tool is the Boresnake. I got one of these as a gift years ago and it is by far the quickest way to clean the barrel of any gun. I now have 4 of them. One for every caliber handgun and one for my AR-15 as well.
Before I started using the Boresnake, I used the standard rod and patch method, which works really well, but takes a lot longer. This method involves soaking a small patch of cloth with solvent and forcing it through the barrel with a rod. It comes out dirty, and you repeat this process with a new patch until it is clean.
The Boresnake cleans the barrel with two passes through the barrel and does an amazing job. They are pretty cheap and you can clean them in the washing machine!
Kimber 1911 Cleaning Video
You can watch the video below, or scroll down to the step-by-step Kimber 1911 gun cleaning instructions.

Field Stripping and Cleaning your 1911 Step-by-Step with Pictures
Unload the gun
This is step number one. Remove the magazine, and empty the chamber in that order! Remove all ammo from the area.
Unload the gun again
This in case you skipped step number one. Please double check that the mag is out and the chamber is empty. See the 4 rules of Gun safety.
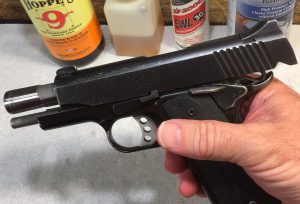
Remove the slide from the gun

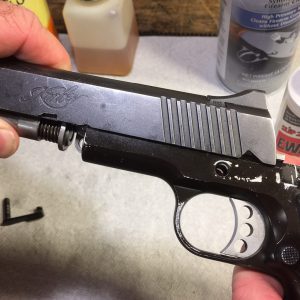

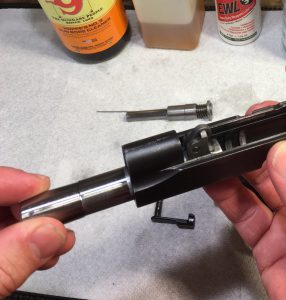
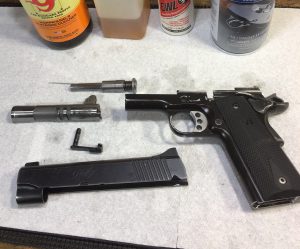
Clean barrel and guide rod assembly
Use Hoppes Number 9 solvent & a rag or cotton swabs to clean the outside of the barrel and guide rod assembly. Clean the inside of the barrel using a Boresnake that is the correct size for the caliber of the gun. In this case, 45 ACP.
Insert the small end of the Boresnake and pull it through slowly at lease 2 times. If the barrel is extremely dirty, you can apply some Hoppes Number 9 to the snake to help things along.
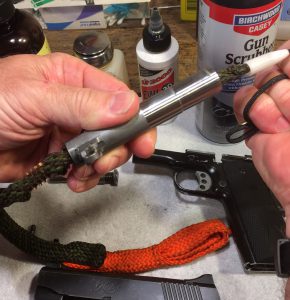
Wipe excess solvent off with a paper towel or soft cloth.
Clean the frame
Using Hoppes #9 solvent and a paper towel or cotton swabs, clean all surfaces of the frame, especially the rails where the slide contacts the frame. Alternatively, spray it down with Birchwood Casey Synthetic-safe Gun scrubber or equivalent. After either method, use a paper towel or rag to wipe all solvent off of the frame.
Lubricate
Using a quality lubricant such as Frog Lube, Slip 2000 (my preference as this is thicker than most and stays on the gun a long time) or Tri-flow superior Lubricant, apply sparingly to the following areas:
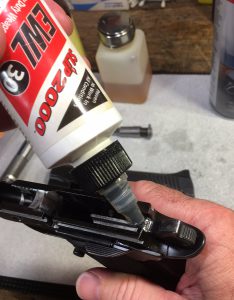
Frame:
- Rails
- Hammer pivot
- Slide stop
- All moving parts in trigger control area
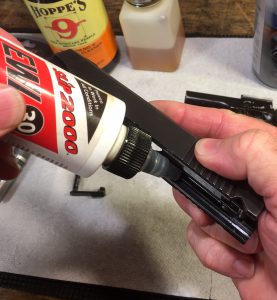
Slide:
- Rails
- Hammer cocking surface
- Firing pin aperture
No need for more than a few drops. The oil will move around on its own and coat the necessary surfaces.
Reassemble the gun
This part is tricky the first time you do it, but very easy once you do it a couple times.
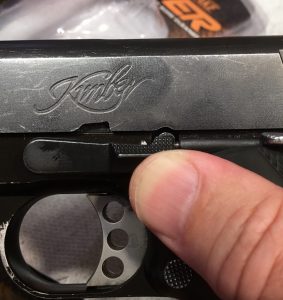
Next, push and lock the slide to the rear using the slide lock lever. Now the pressure is off the take-down tool and it can be removed.
After removing the take-down tool, the gun is ready to go. You will want to work the slide a few times to help spread the lubricant around as well as to make certain the gun is back together properly.
Final Steps
If you want to test the function of the gun, you can take some dummy rounds and load the gun and be sure it ejects a round every time to rack the slide to the rear.
Perform a complete 1911 function and safety check.
There you have it, step by step procedure on cleaning your Kimber 1911 pistol.
Also see my article on How to Clean a Springfield XD or XDm pistol.

Most of this procedure is the same for cleaning any 1911, but most do not have the "bull barrel" and the steps to removing the slide are slightly different.
See also my tutorial: How to Clean a Bodyguard .380.
If you have questions or comments, or a better product to use for cleaning or lubrication, please leave a comment below and I will respond!
How To Clean A Kimber 380
Source: https://kydexowbholsters.com/how-to-clean-a-kimber-1911
Posted by: princeflaid1999.blogspot.com
0 Response to "How To Clean A Kimber 380"
Post a Comment